Sunday, December 15, 2013

Menu Plan - Christmas Means Korv for Swedes!


I just came from the Annual Lucia festival at our local Lutheran Church.  The festival is always followed by a small gathering with traditional sweet treats along with Korv (yummo) and pickled herring (yucko).  It made me hungry for Korv so I stopped at the store on the way home and buy some even though this is supposed to be a light grocery shopping week!


Here is a photo of korv in its uncooked state.  I will parboil it, cut it into 2-3 inch pieces and finish it off by browning it in a frying pan.  We eat it with mashed potatoes with butter and corn any everyone in my family loves it!  I will try to remember to take a picture after I am done cooking it on Tuesday.  It might not look like anything exciting in its raw state, but trust me, looks are deceiving!! 
Onto the menu for the week:
 
Sunday - My kids were at my in-laws and they ate there.  I grabbed a bite at Lucia and my husband fended for himself.
Monday - roast beef with potatoes and carrots in the crock pot
Tuesday - korv, mashed potatoes and corn
Wednesday - I have no idea, but I am not cooking.  I am hosting craft night at my house so I am guessing my husband and kids will hide out at my in-laws.  They will either eat there or go to the Texas Hot before they visit.
Thursday - tacos
Friday - homemade pizza and tossed salad
Saturday - we will eat out as we will be out Christmas shopping


Sunday, September 22, 2013

Friday, August 23, 2013

Sewing Every Day Plan was a Disaster

It has been a crazy summer and my Sew Every Day Plan was a disaster.  So bad that I don't even really want to talk about it.  Suffice it to say, it did not happen.  Life has been crazy as far as my job goes and even though I was off for the summer, it still had a way of interfering.  I can't really talk about it, but let's just say it has been very, very weird.
Today was my first day back to work.  It was a work in your classroom day to prepare for the kids coming.  Monday is jammed full of meetings and Tuesday the kids start.  It will be my 25th year of teaching (I guess I am getting old) and I still love being with the kids and trying to inspire them to love math.
Tonight we just had some casseroles that I had frozen.  I had an 8 by 8 dish of chicken penne pasta alfredo and an 8 by 8 dish of chicken stuffing casserole.  My sons were hungry after golf practice and there wasn't much left to put in the fridge.  What was left will be packed for someone's lunch.  Speaking of school lunches, the quality has gone down and the prices have gone up, so I am going to try to pack 4 times a week, if not every day.    Today I took a grilled chicken salad with sun dried tomato feta and lots of garden veggies.
I will be glad to be back in a routine.  Hopefully things calm down at work.

Saturday, August 3, 2013

Sewing Every Day for a Week - Saturday - Noodlehead Gathered Clutch

I made a noodlehead gathered clutch a long time ago and it turned out really cute.  At that time I cut out the pieces for 4 more and they have been sitting in my sewing room ever since.  I pulled one out and finished it today.  3 more to go!  They are fun but they take me a few hours to make.  Maybe I am just slow!  I did add a lot of details.  It has a detachable wrist strap, a divider and 2 credit card pockets.
I am adding this to my gift stash for when I need a quick gift for a friend.

Sew Every Day for a Week - Wednesday and Friday - Crayon Rolls

Tuesday was the first day of my challenge and I made baby gifts.  Unfortunately I forgot to take pictures before I gave the gift away.  Wednesday and Friday I made 12 crayon rolls.  10 will go to church and 2 will go into my gift stash.  That should restock the church quite well.  Children that are visiting get a crayon roll and coloring book to keep.
I hate to admit it, but I didn't sew on Thursday.  Some crazy stuff was going on and my phone was ringing off the hook.  I can see already that a week is not going to cut it for what I need to catch up on in the sewing room.  I am going to extend it out until next Friday which will make it 10 days of sewing since I missed a day.  I am having fun doing this.
I can't believe how long the crayon rolls took.  It seemed like I was cutting out pieces and interfacing for hours!

Sewing Every Day for a Week - or Not...

I set a goal a few days ago to sew every day for a week and I already missed a day.  I started Tuesday night and made a baby gift of 3 bibs and a jumbo receiving blanket.  It was late and dark so I put off pictures until morning.  In the morning I put the gifts in a bag and sent it with my sons to the recipient.  I never remembered to take a picture.
On Wednesday I cut out the pieces for 12 crayon rolls and sewed 4 of them together.  Maybe I am doing something wrong but it seemed to take hours to cut all the pieces and they were all rectangles.  Thursday was a little crazy because life is like a soap opera right now and I was tapped out and never made it to the sewing machine.  Friday night I finished the other 8 crayon rolls.  We will have to see what tomorrow brings.  Even though I missed a day I am going to keep plugging away.  Sewing is good therapy. 

Wednesday, July 31, 2013

I'm Going to Sew Every Day for a Week

Sewing Groove - I am Giving Myself a Sewing Challenge!

I have so (sew) many things I want/need to sew and I have really been slacking, so it is time to set a good goal.  I am going to sew every day for a week for at least one hour (most days it will be more like 3 or 4 hours).  I started Tuesday night and will post pictures when it is daylight on Wednesday.  I finished 2 baby bibs I had started (girl Colors), made 3 more bibs (boy colors) and a jumbo receiving blanket.  I have so much more that I want to do and I can't get it done in a week, but a week will put and good dent in my list.  I am sure I will stray from the list somewhat since pinterest is giving me new ideas daily, but I will sew something every day whether it actually comes from this list or not... 

Are you ready for the scary list?  Here we go!

1.  Catch up on the Lucky Stars Block of the Month from Don't Call Me Betsy.  I am ashamed to say that I only finished the practice block and the January block.  I started February and haven't picked it up since.  I won't get completely caught up in a week, but I need to get a few of them done!

2.  I need to make something for my 2 kitchen windows.  I am trying to get a stain out of an old tablecloth my great grandmother embroidered so I can make it into 2 window toppers.  If I can't get it out I will whip something up from my regular fabric stash.

3.  Make a new lunch tote using the pink penguin tutorial altered to the bigger size that I made twice before.  I love this pattern and it is free on Ayumi's site!

4.  Purse

5.  Tote Bag

6.  A long lanyard for my keys because I keep misplacing them.

School starts in a few weeks and I would like to have #3, 4, 5, and 6 done by then.

7.  I need to make at least 6 crayon rolls to replenish the stash at church.  Done - I made 12!

8.  I have a Halloween quilt top that has been sitting lonely for about a year.  It is not going to baste, quilt and bind itself.

9.  I have a quilt top that I started in June for my 18 year old nephew who will be going off to college soon.  I ditched the quilt plan and gave him something else.  I thought the fabrics were a good choice when I bought them but I just wasn't feeling it when I started putting it together.  It is tough to pick out fabrics for an 18 yr. old boy.  I gave him a stash of money and some other things for graduation instead.  I will finish the quilt and gift it to a different male in the family for Christmas of donate it to a quilt drive.  It is the first quilt top that I have made that I felt didn't match the recipient.  Did that ever happen to any of you?

10.  A gift for a fellow blogger that I have been wanting to do something nice for...

11.  Finish some noodlehead gathered clutches.  I have had 4 cut out and started for months, but they have just been laying in my sewing room.  I am not sure why because they aren't hard and look awesome when they are done.  I finished 1 so far.

12.  Make a bib tutorial.

I know I will finish at least a few of these things if I sew every day for a week.  I am also sure that I will get off track from this list and make at least one thing not mentioned here!  I made a baby gift consisting of 3 bibs and a jumbo receiving blanket.  I also finished 2 other bibs that I had started and I added them to my gift stash.

WISH ME LUCK!!!

Thursday, July 11, 2013

Girl Bibs

A new group of girl edition bibs with ties.  I made some for my brother's brother-in-law and sister-in-law and every time I saw them the bibs were in use.  I don't know about the rest of you crafters but it makes my day when I see people really using and loving the items that I spent time  made for them.  2 years and another baby girl later, I felt it was time to gift them with a few more bibs, so I made them a set of 6.  There are some close-ups below.


Friday, July 5, 2013

Custom Size Dish Mat

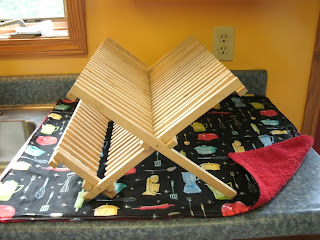
I made a second dish mat from bath towel because I loved the first one so much.  This will let me use one while the other is being washed.  Love them!
Here is the one from last week:
It is such a fun and easy project! 
1.  Cut the fabric and towel to one inch wider and longer than the area you want to cover.
2.  Lay the right sides together and sew with a half inch seam allowance.  Leave a couple of inches open on one side for turning.
3.  Press - ironing makes all the difference for a nice finished project.
4.  Top stich around the edge.  Make sure you catch the whole you used for turning to close it securely.
5.  Iron again.
6.  Sit back and enjoy the simple beauty of this 5 minute project.  Others will ooh and ah and think you are a genius.  I can't speak for you, but I am NOT a genius.
7.  Maybe even go and wash some dishes!
 
Note:  I think it might be easier to cut the fabric to the size you want and attach it to the complete towel and then trim the excess towel off after step 2.  This will allow for slight shifting as you are working with 2 completely different materials and textures.

Thursday, July 4, 2013

Another Baby Gift Set

This is another gift set that I made for a coworker who is expecting a girl.
 
It looks very similar to the first set I made because I used many of the same fabrics.  The item with the pink terry towel backing is a burp cloth that is about the size of a hand towel.  The item with the yellow flannel backing is a 40 by 40 inch receiving blanket.  The flower print is also flannel.
Both sets are pictured together below...
I think they were well received.

Friday, June 28, 2013

Bibs for Boys

I made a few bibs for my nephew who is almost 2 and drools quite a bit as he is teething.  We headed to Disney a few weeks ago and I thought these would be good for the trip.  They are made with quilting fabric on the front and absorbent bath towel on the back.  The tie is a 2.5 inch strip cut from yardage. 
 
These bibs take a little longer to make than Velcro but they are great for older kids because they tie and can't be ripped off as easily as Velcro.  I am thinking that I need to come up with a tutorial to share.  I really enjoy making them.

Dish Mat from Bath Towel


My dish drainer usually sits on 2 overlapping kitchen towels (see below) and it really bothers the OCD side of me. 
As you can see above, the two towels are different prints and sizes and it just looks yucko!  I measured the area I wanted to cover and added and inch to the length and an inch to the width.  Next you need to put the print side of the cotton facing the towel and sew around with a generous half inch seam allowance.  Don't forget to leave an open space for turning the project right side out.  Once it is turned right side out iron like crazy and top stitch the whole way around making sure you catch the opening that you left for turning.  Press again and enjoy having a mat that is custom fit to your dish drainer area!  I had enough of the bath towel left to make 2 bibs, so this was a really low cost project.  The towel was $3.50 from walmart and the cute kitchen fabric is also from walmart.  I don't remember the price because I had it in my stash, but I doubt is was more than 5 or 6 dollars a yard.


Thursday, June 20, 2013

Baby Gift Set

This is a baby gift set that I made for a coworker who is expecting a girl.  The burp cloth is about the size of a hand towel and has a hot pink towel backing.  The blanket is jumbo receiving blanket measuring in at 40 inches square.  The front and the back are both flannel.  The bibs are either cotton or flannel on the front and towel or fleece on the back.  The ties are 2.5 inches by the width of fabric and are made in the style of double fold bias tape.  It was a fun set to make and I think the recipient liked it.


Saturday, May 25, 2013

Dressed Up Potholders

These potholders were from the dollar store.  I just dressed them up with a little bit of cute fabric!  Short, easy, and quick project!

Tuesday, May 21, 2013

More Crayon Rolls

I made 10 more crayon rolls to help supply the gift box for visitors at church.  They are easy and fun to make.  They really went fast because I made them all at once, assembly line style.
 Football and bright neon colors.  I have a few other ladies at church making some more and that should give us a stash to last through summer.


Friday, May 17, 2013

Swedish Flag Pillows for Mother's Day

So I made my mom 2 Swedish Flag pillows for Mother's Day to match the Swedish Flag Quilt I made her for Christmas.  They were a hit.  She seemed to really like them.  They are small, decorative throw pillows.  Here is another view.
I used a yellow and blue striped decorative weight fabric for the back.


Wednesday, May 15, 2013

Blanket and Bibs for Coworker

I have 3 coworkers expecting babies soon.  This gift is for a mom-to-be for her second child.  It is a jumbo flannel receiving blanket and bib set.  Football flannel on one side and red marbled flannel on the other.  The blanket is about 40 in by 40 in and the bibs are about 11 in by 11 in.  It is harder with the second child to know what to give, but I figure that blankets and bibs get a lot of use and maybe aren't the best in a hand-me-down state.  The mom-to-be seemed pleased with the gift.

Tuesday, May 14, 2013

Secret Sister Swap - Thank You Carla!

So - I signed up for the Secret Sister Swap at Carla's "My Half Dozen Daily Blog" before Easter.  I never heard from my secret sister which I knew might be a possibility when I signed up.  Carla wanted to send me something because she felt bad, but I kept telling her not to worry about it because sometimes that's just how things work out.  If you know Carla or follow her blog at all, you won't be surprised to find out she sent me something anyway.
I received a copy of Make it Yourself magazine, jelly belly jelly beans, awesome fabric and the most amazing citrus colored jumbo zipper pouch.  Carla showed a picture of it a week or so ago on her blog and I commented on how cute it was, but had no idea it was intended for me.  I feel so honored and am humbled to have received one of Carla's magnificent creations.  Even the inside is adorable!
Thank you Carla!  I feel bad because you had your own secret sister to send a package to and you did double duty by sending another package to me.  I was actually deathly sick with the flu when I got this in the mail yesterday.  Seeing this made my day so much better! 
I appreciate your kindness more than you will ever know.  I will also  be "paying you back" in the next couple of weeks with a little goody surprise package in your mailbox. 

Sunday, April 28, 2013

Crayon Rolls for Church


 Our church council decided that we wanted to have some things to make visitors feel more welcome when they are with us.  I ended up in charge of an item to be able to give to the kids.  I came up with crayon rolls.  Each visiting child will be given a crayon roll and a bible coloring book to take home. 


I followed this tutorial that I found on pinterest.  I just skipped the ric-rac.

Juice Pouch Wallets for Earth Day


Our students were given a drink and a snack each day during the state tests.  We saved all of the juice pouches and recycled them into wallets for the kids for earth day.  I cut open the bottom of each pouch, washed them by hand and then sent them through the dishwasher to sanitize them.  I waited until they were completely dry and then made them into wallets.  Each takes 2 pouches and a small piece of velcro for closure purposes.  They were a hit!  It only took about 4.5 hours to make 95 of them.


Sunday, March 31, 2013

Tula Pink Prince Charming Tote


When my niece was home for Easter today, we whipped up a quick tote back in Tula Pink's Prince charming fabrics.  We only had about 40 minutes and we had to work fast.  She seemed pleased with the results, but the perfectionist in me is not happy.
 

We guessed at the measurements and I feel that the tote is too long (the picture does not show the whole length).  I did not have time to show her how to box the bottom corners and I feel like that is where things went wrong.  If we would have had time to do that it would have cut about 3 inches of the length and about 3 inches off each size of the width.  It would have also given the bag a flat bottom and a more professional finish. 
I already have a plan.  Next time she is home, I am going to pull the lining out and cut an inch off the bottom of the lining and the outside of the bag.  I will then sew across each and leave a few inches on the lining for turning.  I will box the corners, and put the bag back together and that should fix it!

Mickey Mouse Tote

I made this tote last summer before we went to Disney.  It has a layer of fusible fleece and a layer of insulbrite (like you would put in a potholder).  I wanted a thicker liner to keep bottles of water cooler longer.  It worked ok, but it was just so darn hot when we were there.  It also has a magnetic closure and the pink and orange Mickey on the front is a pocket.
I wasn't blogging at the time I made this and I gave it to my niece when I got home.  When I saw her for Easter today, I thought I would snap a picture for the old blog!  I received a lot of compliments on it when we were at Disney.  My niece and I whipped up another quick tote when she was here today.  It will be an upcoming post. 

Wednesday, March 20, 2013

Basket Tutorial


My sons are in high school and seem a little old for the traditional pastel Easter baskets, so I went ahead and made them each a new one.  My youngest loves Penn State so that was an easy choice for him.  My oldest seemed to be drawn to the flame/guitar material, so that is what I used for him.


The dark blue Penn State material is 9.5 in by 16 in.  The white is 3 in x 16 in.  Sew the white and blue pieces together with 1/4 in seam allowance and then iron fusible fleece to the back of each piece.

Pin the 2 exterior pieces, right sides together and sew around the left, bottom and right sides with a 1/4 inch seam allowance.


Next I cut 2  12 in by 16 in pieces for the inside from the blue pawprint material and ironed fusible fleece to the back.  Pin the 2 interior pieces, right sides together and sew around the left, bottom and right sides with a 1/4 inch seam allowance.  Leave a few inches unsewn at the bottom in order to turn the project right side near the end of the project.
 
Box the bottom corners of the interior piece and exterior piece to help the final project stand upright.  My purple line (shown above) is 5 inches.  I sewed across this line 3 times for strength. Cut off the excess point about 1/4 to 1/2 inch from the seam line to eliminate bulk.


Cut 2 pieces of 3.5 in by 9.5 in fabric for the handles and iron fusible fleece to the back of one piece.  Put right sides together and sew a 1/4 seam down one of the 9.5 in sides.  This is where I forgot to take pictures.  Iron the piece open.  Fold the 2 raw edges to the inside all the way to the other side and press like crazy.  This will give you a handle about 1.5 in wide.  Sew down the side and it should end up looking like the picture below.  Repeat this process as you need 2 handles.
 
 
You will now have 2 handles and you are ready to put the basket together!


Next put the 2 pieces inside of each other, right sides together.  Tuck the handles down inside, making sure they are not twisted and pin like crazy!  Hint - put your pins pointing down, not pointing up like mine if you want to avoid stabbing yourself repeatedly while sewing! 
 
Sew around the perimeter with a 1/4 in seam allowance, pulling the pins out as you go.
 
Pull the project right side out through the opening you left in the bottom of the lining.

 
Press the raw edges from the whole you left for turning under and iron well.

Sew the whole closed.  I did a line of straight stitching and a zig zag stitch because I am a little OCD.
 
Tuck the inside into the bag and press well.

I finished up with a row of top stitching a 1/4 in from the edge.  Now you should have an awesome basket!